Плавайте поездами Аэрофлота
Twist


Описание ( на английском)
Twist
The twist is one of the two ways I know to braid two strands. The other is the herringbone. Note that if you are doing the twist as a classic or a crown, you can choose to add hair to just the bottom side of the braid (incorporating hair from both above and below the twist, but adding it only to the bottom strand instead of both, as shown here).
Directions:
1. Gather a section of hair where you want to start the twist.
2. Insert your index finger from under the section to the top of the section, splitting the section into two strands.
3. Twist both strands in the same direction and cross over in the opposite direction. In this example, twist to the right a couple times, then cross the right hand strand over the left hand strand.
4. Gather small sections of hair (as for french braid) and add one to each strand before continuing.
5. Repeat instructions 3-4 to bottom of head.
6. Repeat instruction 3 to bottom of braid.
7. Finish off twist with hair fastener.


описание
Cascade, aka Cascading Crown
Before attempting this, learn how to do the crown braid. The only difference is that you leave out sections along the back. Like the crown, this can be done as a number of braid types - French, Dutch, twist, 4-strand-5-strand, etc. Note that the wider the braid (particularly more than 5 strands), the harder it is to bend the braid and keep it looking nice. Here I demonstrate a Dutch cascade.
Directions:
1. Learn to do a crown braid.
2. Part and clip the hair as for a crown.
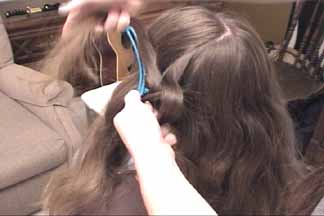
3. Gather a section of hair as for a crown.
4. Split the hair into the required number of strands. In this case, three.
5. Cross the top strand under, then the bottom strand under.
6. Gather a normal-sized section of hair, but gather from the crown of the head down to the base of the scalp. Do NOT join it to one of the strands.
7. Bring the gathered section under the braid and add it to the hair in the clip.
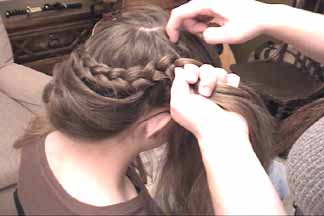
8. Gather a very small section of hair from crown to braid and add it to the top strand, then cross that strand under.
9. Gather a small section of hair (but not so small as the top) from the base of the neck to the braid, and add it to the bottom strand. Cross the bottom strand under.
10. Repeat instructions 6-9 until the most recent small sections gathered and added the braid form a part from the crown of the head to the point of the ear.
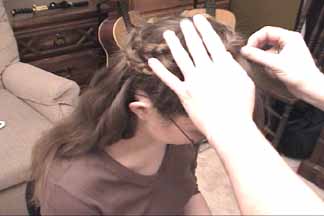
11. Continue to braid as for a regular crown.
12. Remove the clip when you reach the middle part, as for a normal crown braid.
Note: if the gathered hair swoops downward on the braid, as in the picture, you're gathering too small of strands. If it swoops in the opposite direction (higher on the braid), you're gathering too big of sections. The swoopy effect can look nice, but it's not picture perfect.
13. Continue the braid, after all the hair has been added, out to the end of the hair and tie off the braid.
14. Cover the beginning of the braid with the tail and wrap the tail around the braid, continuing the circle.
Note: If you do a 3-strand Dutch, wrap the tail around the outside. If you do a French, lay the tail on top of the first part of the braid. For a twist, wrap either on the outside or tuck on the inside, whichever looks better.
15. Fold the fuzzy part of the tail under and pin the tail so that the fuzzy bit won't show.
Note: On Dutch crowns, you don't actually have to fold the tail under. Tuck it well under the edge and pin the edge of the main braid over the tail so that it's secure and hidden.
16. Pin the tail in several places, such as on the side at the bottom of the tail...
17. At the back of the head, at the bottom of the tail...
18. ...and at the top of the tail.
19. Pin the very beginning of the tail at the bottom to make sure it remains positioned over the start of the braid.
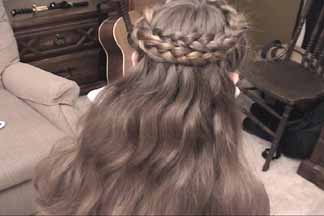
And there you have it - a cascading crown braid.
Enjoyed the site? Make a donation of any amount, if you are so inclined! If not, enjoy the site anyway!
Увы((( с переводом не мне((
Описание ( на английском)
Twist
The twist is one of the two ways I know to braid two strands. The other is the herringbone. Note that if you are doing the twist as a classic or a crown, you can choose to add hair to just the bottom side of the braid (incorporating hair from both above and below the twist, but adding it only to the bottom strand instead of both, as shown here).
Directions:
1. Gather a section of hair where you want to start the twist.
2. Insert your index finger from under the section to the top of the section, splitting the section into two strands.
3. Twist both strands in the same direction and cross over in the opposite direction. In this example, twist to the right a couple times, then cross the right hand strand over the left hand strand.
4. Gather small sections of hair (as for french braid) and add one to each strand before continuing.
5. Repeat instructions 3-4 to bottom of head.
6. Repeat instruction 3 to bottom of braid.
7. Finish off twist with hair fastener.
описание
Cascade, aka Cascading Crown
Before attempting this, learn how to do the crown braid. The only difference is that you leave out sections along the back. Like the crown, this can be done as a number of braid types - French, Dutch, twist, 4-strand-5-strand, etc. Note that the wider the braid (particularly more than 5 strands), the harder it is to bend the braid and keep it looking nice. Here I demonstrate a Dutch cascade.
Directions:
1. Learn to do a crown braid.
2. Part and clip the hair as for a crown.
3. Gather a section of hair as for a crown.
4. Split the hair into the required number of strands. In this case, three.
5. Cross the top strand under, then the bottom strand under.
6. Gather a normal-sized section of hair, but gather from the crown of the head down to the base of the scalp. Do NOT join it to one of the strands.
7. Bring the gathered section under the braid and add it to the hair in the clip.
8. Gather a very small section of hair from crown to braid and add it to the top strand, then cross that strand under.
9. Gather a small section of hair (but not so small as the top) from the base of the neck to the braid, and add it to the bottom strand. Cross the bottom strand under.
10. Repeat instructions 6-9 until the most recent small sections gathered and added the braid form a part from the crown of the head to the point of the ear.
11. Continue to braid as for a regular crown.
12. Remove the clip when you reach the middle part, as for a normal crown braid.
Note: if the gathered hair swoops downward on the braid, as in the picture, you're gathering too small of strands. If it swoops in the opposite direction (higher on the braid), you're gathering too big of sections. The swoopy effect can look nice, but it's not picture perfect.
13. Continue the braid, after all the hair has been added, out to the end of the hair and tie off the braid.
14. Cover the beginning of the braid with the tail and wrap the tail around the braid, continuing the circle.
Note: If you do a 3-strand Dutch, wrap the tail around the outside. If you do a French, lay the tail on top of the first part of the braid. For a twist, wrap either on the outside or tuck on the inside, whichever looks better.
15. Fold the fuzzy part of the tail under and pin the tail so that the fuzzy bit won't show.
Note: On Dutch crowns, you don't actually have to fold the tail under. Tuck it well under the edge and pin the edge of the main braid over the tail so that it's secure and hidden.
16. Pin the tail in several places, such as on the side at the bottom of the tail...
17. At the back of the head, at the bottom of the tail...
18. ...and at the top of the tail.
19. Pin the very beginning of the tail at the bottom to make sure it remains positioned over the start of the braid.
And there you have it - a cascading crown braid.
Enjoyed the site? Make a donation of any amount, if you are so inclined! If not, enjoy the site anyway!
Увы((( с переводом не мне((
@темы: интересности